Mary Berry Coconut Cake Recipe | Light, Moist & Full of Flavor
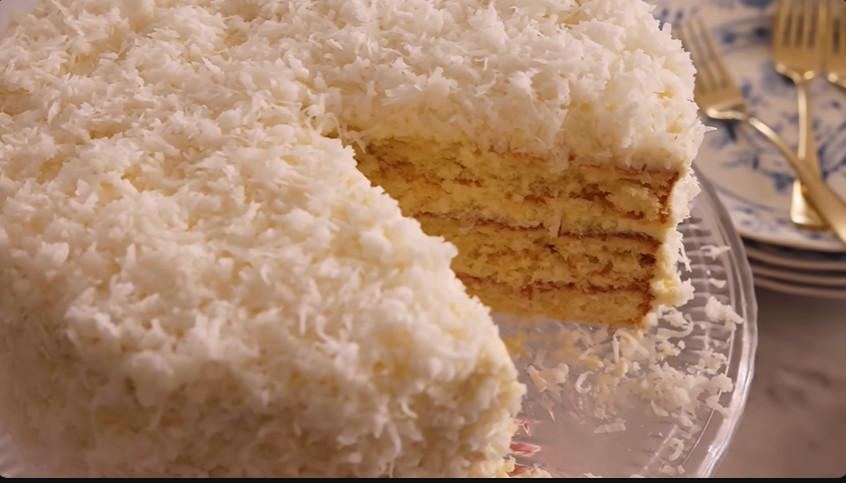
Craving a moist and fluffy coconut cake? My Mary Berry Coconut Cake Recipe is the ultimate teatime treat, combining the richness of butter, the creaminess of coconut milk, and the crunch of desiccated coconut. Just like Mary Berry herself, I love keeping recipes indulgent yet straightforward, and this one ticks all the boxes. The coconut buttercream frosting adds a creamy, dreamy finish, and a coating of desiccated coconut makes it look as good as it tastes.
Whether you’re baking it for a family gathering, a birthday, or simply a Sunday afternoon indulgence, this cake is guaranteed to impress. The texture is light but moist, and every bite is packed with coconut goodness. If you’re a fan of Mary Berry’s classic bakes, this one will quickly become a favourite in your recipe collection.
Cake Preparation
Making this Mary Berry Coconut Cake is simple. Follow these steps for a light, moist sponge with that signature coconut flavour.
Step 1: Preheat and Prepare
Preheat your oven to 180°C / 160°C fan/gas mark 4. Grease and line two 20cm round cake tins with baking parchment. This will stop the cake from sticking and help it release easily once baked.
Step 2: Cream Butter and Sugar
In a large mixing bowl, beat together the softened butter and caster sugar until pale, light, and fluffy. I like to use a stand mixer with a paddle attachment, but an electric hand whisk works just as well. This step is crucial as it gives your cake that light, airy texture Mary Berry cakes are known for.
Step 3: Add Eggs and Coconut Milk
Crack one egg at a time, beating well after each addition. Slowly pour in the coconut milk and whisk until combined. Don’t worry if the mixture looks slightly curdled at this stage; once the flour goes in, it will come together beautifully.
Step 4: Fold in Dry Ingredients
Sift in the self-raising flour and baking powder, then gently fold it into the wet mixture using a spatula or metal spoon. The key here is to be gentle and avoid overmixing, so your sponge stays soft and airy. Finally, fold in the desiccated coconut for that sweet, nutty texture.
Step 5: Bake the Cake
Divide the cake batter evenly between the prepared tins and smooth the tops with a spatula. Bake in the preheated oven for 20–25 minutes, or until the cakes are golden brown and a skewer inserted into the center comes out clean.
Step 6: Cooling
Once baked, let the cakes cool in their tins for 5 minutes before turning them out onto a wire rack. Leave to cool completely before adding the buttercream, as a warm cake will cause the frosting to melt.
Buttercream & Assembly
Now that the cakes are baked and cooled, it’s time to make the luscious coconut buttercream and assemble your Mary Berry Coconut Cake.
Making the Coconut Buttercream
- In a large bowl, beat the softened butter until pale, light, and creamy. This can take 3–4 minutes with an electric mixer.
- Gradually add the sifted icing sugar, one spoonful at a time, beating well after each addition. This will give you a smooth and fluffy frosting.
- Add the coconut extract and coconut milk, then whisk until everything is silky and spreadable. If the buttercream feels too stiff, add a splash more coconut milk; if too runny, add a little extra icing sugar.
Assembling the Cake
- Place one sponge layer on a serving plate or cake stand. Spread a generous amount of coconut buttercream evenly across the top.
- Carefully place the second sponge on top, pressing down gently to sandwich the layers together.
- Spread a thin layer of buttercream over the entire cake (this is called a crumb coat). Chill for 15 minutes to set.
- Once chilled, cover the cake with the remaining buttercream, smoothing it with a palette knife for a neat finish.

Decorating with Coconut
Finally, sprinkle or press the desiccated coconut over the cake until fully coated, giving it a beautiful, snowy-white look. For extra flair, lightly toast some coconut flakes and scatter them on top for added crunch and colour.
Serving and Decoration
This Mary Berry Coconut Cake is a showstopper on its own, but you can also add a few finishing touches:
- Fresh Berries: Raspberries or strawberries add a pop of colour and cut the sweetness.
- White Chocolate Drizzle: Melt a little white chocolate and drizzle it across the top for an elegant look.
- Toasted Coconut Flakes: For extra crunch and a golden finish, lightly toast some coconut flakes and sprinkle them over the buttercream.
Serve the cake with a pot of tea or coffee, and you’ll have the perfect centrepiece for an afternoon tea or special family gathering.
Storage Instructions
Keeping the Cake Fresh
Once assembled, store the cake in an airtight container at room temperature for up to 3 days. If your kitchen is warm, keep it in the fridge, then let it come to room temperature before serving.
Freezing the Cake
If you want to make this cake ahead of time, you can freeze the sponge layers (without buttercream). Wrap each cooled sponge tightly in cling film and freeze for up to 1 month. Thaw at room temperature before frosting and assembling.
Buttercream doesn’t freeze as well, so it’s best to make it fresh when assembling the cake.
Mary Berry Coconut Cake Recipe
Ingredients
Video
Notes
Required Kitchen Tools
When making this Mary Berry Coconut Cake, the right kitchen tools will make your baking smooth and stress-free:- Two 20cm Round Cake Tins – Essential for baking the perfect layered sponge.
- Mixing Bowls – One large for cake batter and another for buttercream.
- Hand or Stand Mixer – To cream butter and sugar until light and fluffy.
- Measuring Scales & Spoons – For accuracy in baking.
- Sieve – To sift flour and icing sugar for a lump-free finish.
- Wire Cooling Rack – To cool the cakes evenly.
- Palette Knife – Perfect for spreading and smoothing buttercream.
FAQ – Mary Berry Coconut Cake Recipe
1. Can I make Mary Berry’s Coconut Cake ahead of time?
Yes! You can bake the sponge layers up to 2 days in advance. Store them in an airtight container at room temperature, then assemble with buttercream on the day of serving. For more extended storage, freeze the cooled sponges for up to 1 month and thaw before decorating.
2. What can I use instead of coconut milk?
If you don’t have coconut milk, you can use whole milk or almond milk as a substitute. However, coconut milk adds richness and enhances the tropical flavour, so I recommend using it if possible.
3. Can I toast the coconut for decoration?
Absolutely! Lightly toasting the desiccated coconut gives the cake a crunchy texture and a beautiful golden look. It also intensifies the nutty coconut flavour
4. How do I stop my cake from sinking in the middle?
Make sure you don’t overbeat the batter after adding the flour, and always bake at the recommended oven temperature. Also, avoid opening the oven door in the first 20 minutes of baking.
5. Can I turn this into a loaf cake instead of a layer cake?
Yes, you can bake the batter in a 2lb loaf tin. Adjust the baking time to 40–45 minutes, then check for doneness with a skewer.
6. How do I make the buttercream less sweet?
If you prefer a less sweet buttercream, reduce the icing sugar slightly and add an extra spoonful of coconut milk to balance the flavour while keeping it creamy.
7. What’s the best way to serve this cake?
This cake is perfect as a treat or a dessert. Serve it with a pot of tea, a scoop of vanilla cream, or even some fresh tropical fruit like mango or pineapple for a refreshing twist.
Conclusion
Baking this Mary Berry Coconut Cake is an absolute delight. The combination of light sponge, rich coconut buttercream, and snowy coconut decoration makes it a timeless bake that’s perfect for every occasion. I love how simple the method is, yet the result looks and tastes like something from a professional bakery.
Whether you serve it at a birthday party or a family gathering, or enjoy a slice with a cup of tea, this cake never disappoints. With a hint of nd tropical flavour, it’s one of those recipes that will quickly become a family favourite.
So, roll up your sleeves, grab your mixing bowl, and bring a taste of Mary Berry’s baking magic into your kitchen today. Happy baking!

Sophia Smith is a passionate home baker and dessert enthusiast who loves sharing her favorite recipes, baking tips, and kitchen secrets. Through Roses Baking Passion, she inspires others to bake with love and creativity every day.