Chef Johns Macaroni And Cheese Recipe
Craving a Comfort Food Classic?
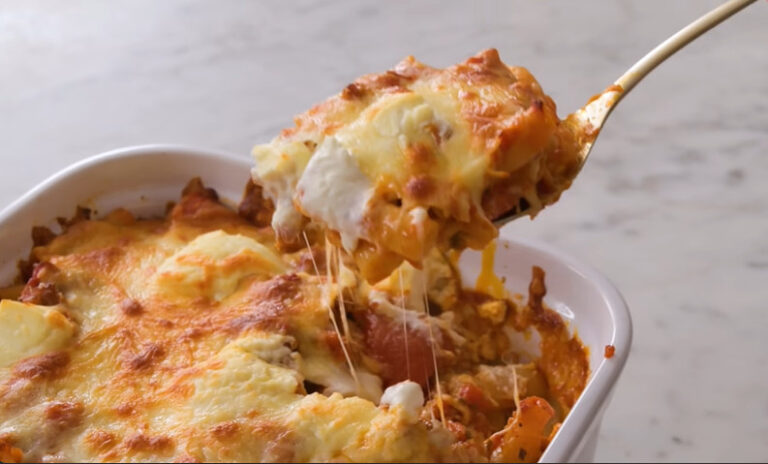
There’s just something magical about a bubbling dish of macaroni and cheese coming out of the oven. For me, Chef John’s version takes it to another level; it’s got the perfect balance of creamy cheese sauce, just the right amount of spice, and a topping that bakes up irresistibly crunchy. The secret is in the sauce: a rich béchamel infused with thyme, a hint of cayenne, and a touch of Dijon mustard for depth.
Whether you serve it as the main attraction or as the ultimate side dish, this recipe delivers comfort in every bite. It’s the kind of dish that makes people ask for seconds (and maybe thirds).
Cooking Instructions
Preparing Chef John’s macaroni and cheese is all about layering flavour and texture. Here’s how I do it step by step for the creamiest, most irresistible results.

Step 1 – Preheat and Prep
I start by preheating my oven to 400°F (200°C). While that’s heating, I bring a large pot of salted water to a boil for the pasta.
Step 2 – Cook the Macaroni
Once the water is boiling, I add the elbow macaroni and cook it for about 8 minutes. I like to keep it slightly firm because it will continue cooking in the oven. Then I drain it well and set it aside.
Step 3 – Make the Roux
In a large saucepan over medium heat, I melt ¼ cup butter. Once it’s bubbling gently, I whisk in the flour and cook for 3 to 4 minutes until it turns a pale yellow. This removes that raw flour taste and gives the sauce a nutty aroma.
Step 4 – Add the Seasonings
Next, I stir in the dried thyme, cayenne pepper, and white pepper, letting them bloom in the butter-flour mixture for about 1 minute. This step deepens the flavour and adds that subtle warmth Chef John is famous for.
Step 5 – Build the Sauce
I slowly whisk in 1 cup of milk until smooth, then add the rest of the milk gradually, whisking constantly. Once it’s combined, I add the salt, Worcestershire sauce, and a pinch of nutmeg. I let this simmer, whisking often, for about 8 minutes until it’s thick and silky.
Step 6 – Melt the Cheese
When the sauce is ready, I turn off the heat and stir in 2¼ cups of shredded cheddar cheese along with the Dijon mustard. The result is a luscious, velvety cheese sauce that smells incredible.
Step 7 – Combine with Pasta
I transfer the cooked macaroni into a large baking dish, pour the cheese sauce over it, and stir gently until every piece is coated in that creamy goodness.
Step 8 – Prepare the Topping
In a small bowl, I mix the panko bread crumbs with one tablespoon of melted butter. This will give the top layer a beautiful crunch.
Step 9 – Assemble and Bake
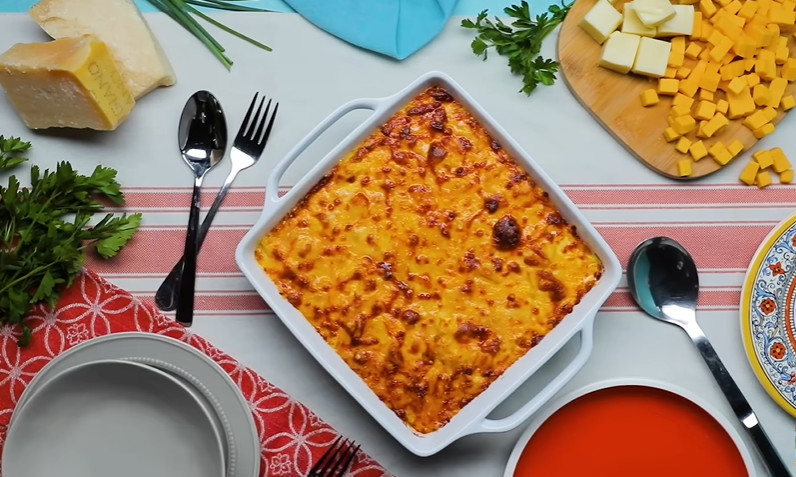
I sprinkle the panko mixture evenly over the pasta, then top it with the remaining ¾ cup of shredded cheddar cheese. Into the oven it goes for about 20 minutes, or until the top is golden brown and bubbly.
Step 10 – Serve and Enjoy
I let it rest for a few minutes before serving, which is the most challenging part because it smells so good! When you scoop into it, you’ll get that perfect contrast of creamy, cheesy pasta and crisp, buttery topping.

Serving and Decoration
How I Serve It
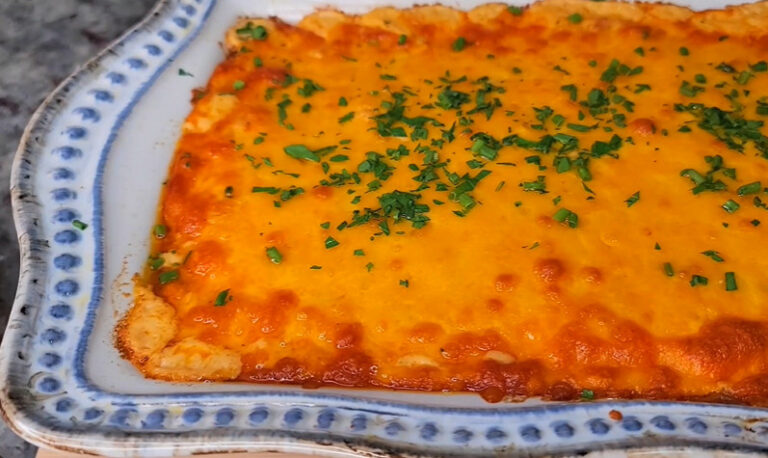
When I serve Chef John’s macaroni and cheese, I like to bring it straight to the table in its baking dish; that golden crust deserves to be shown off. I usually pair it with a fresh green salad or some roasted vegetables to balance the richness. It’s also the ultimate side dish for BBQ ribs, roast chicken, or even a holiday turkey.
For a casual get-together, I’ll scoop portions into individual ramekins before baking; it makes for a beautiful, personalised presentation.
Suggested Toppings and Enhancements
One of the things I love about this recipe is how adaptable it is. The basic version is already amazing, but here are some toppings and mix-ins that take it to another level:
- Extra Cheese Crust: Mix in some grated Parmesan with the panko for a sharper, saltier crunch.
- Bacon Crumble: Sprinkle crispy bacon bits on top before baking for a smoky, savoury kick.
- Herb Infusion: Add fresh parsley, chives, or thyme on top after baking for a pop of colour and freshness.
- Spicy Upgrade: Increase the cayenne or add sliced jalapeños for a bolder flavour profile.
- Gourmet Twist: Stir in sautéed mushrooms, caramelised onions, or lobster chunks for a luxurious version.
Flavor Variations
If you’re in the mood to experiment, here are a few of my favourite variations that still keep the essence of Chef John’s style:
- Three-Cheese Blend: Combine sharp cheddar with Gruyère and Fontina for a more complex flavour.
- Smoked Cheese Version: Use smoked cheddar for a deep, campfire-inspired taste.
- Veggie-Packed Mac: Fold in steamed broccoli, peas, or roasted red peppers before baking for extra nutrition and colour.
- Buffalo Mac & Cheese: Add a drizzle of buffalo sauce to the cheese mixture and serve with blue cheese crumbles.
With these ideas, you can turn this recipe into your own signature dish while keeping that comforting, cheesy soul intact.
Storage Instructions
How to Keep Macaroni and Cheese Fresh
If you somehow have leftovers (which doesn’t happen often in my house), you can store them in an airtight container in the refrigerator for up to 4 days. I recommend reheating in the oven at 350°F (175°C) until warmed through; this helps revive the crispy topping. For quicker reheating, the microwave works, but the texture of the crust won’t be as crunchy.
Freezing Macaroni and Cheese
Yes, you can freeze this dish! I let the baked mac and cheese cool completely, then portion it into freezer-safe containers. It can be stored for up to 2 months. To reheat, thaw overnight in the refrigerator and bake at 350°F (175°C) until hot and bubbly.
Chef Johns Macaroni And Cheese Recipe
Ingredients
Video
Notes
Required Kitchen Tools
When I make Chef John’s macaroni and cheese, I find that having the right kitchen tools makes everything smoother and more enjoyable. Here’s what I always keep handy:- Large Pot: For boiling the macaroni until perfectly al dente.
- Large Saucepan: Essential for preparing the rich cheese sauce.
- Whisk: To ensure a silky, lump-free béchamel.
- Mixing Bowls: For combining the panko topping and prepping ingredients.
- Baking Dish (3-quart): The perfect vessel for baking and serving.
- Wooden Spoon or Silicone Spatula: Great for mixing pasta with sauce without scratching your cookware.
Frequently Asked Questions (FAQ)
1. Can I make Chef John’s macaroni and cheese ahead of time?
Yes! You can prepare the pasta and cheese sauce, combine them in the baking dish, add the topping, and refrigerate (covered) for up to 24 hours. When you’re ready to bake, let it sit at room temperature for about 20–30 minutes, then bake as directed.
2. Can I use a different type of pasta?
Absolutely. While elbow macaroni is traditional, you can use cavatappi, penne, or shells. Just make sure to cook them al dente so they hold their shape after baking.
3. What’s the best cheese for macaroni and cheese?
Sharp cheddar is the classic choice, but for extra depth, try a blend of cheddar, Gruyère, and Fontina. Always shred your own cheese for the creamiest melt; pre-shredded cheese contains anti-caking agents that can affect texture.
4. How do I keep the sauce from getting grainy?
Grainy sauce usually comes from overheating the cheese. Make sure to turn off the heat before stirring in the cheese and add it gradually, stirring until smooth.
5. Can I make it gluten-free?
Yes! Just use gluten-free pasta and substitute a gluten-free flour blend for the roux. Gluten-free panko breadcrumbs are also available for the topping.
6. How can I make this recipe spicier?
Increase the cayenne pepper to ½ teaspoon, or add diced jalapeños, a splash of hot sauce, or crushed red pepper flakes to the sauce.
7. Is it possible to make this without baking?
It is! Skip the panko topping and serve the stovetop version once the pasta is coated in sauce. It’ll be creamy and delicious, just without the crispy crust.
Conclusion
Making Chef John’s Macaroni and Cheese Recipe at home is pure comfort on a plate. The combination of creamy cheese sauce, tender pasta, and that signature golden panko crust makes it irresistible from the very first bite. I love that it’s simple enough for a weeknight dinner but special enough to serve at holidays and gatherings.
The beauty of this recipe lies in its versatility; you can stick to the classic or make it your own with bold toppings, extra spices, or unique mix-ins. Either way, every forkful delivers that satisfying balance of cheesy creaminess and satisfying crunch.

Sophia Smith is a passionate home baker and dessert enthusiast who loves sharing her favorite recipes, baking tips, and kitchen secrets. Through Roses Baking Passion, she inspires others to bake with love and creativity every day.