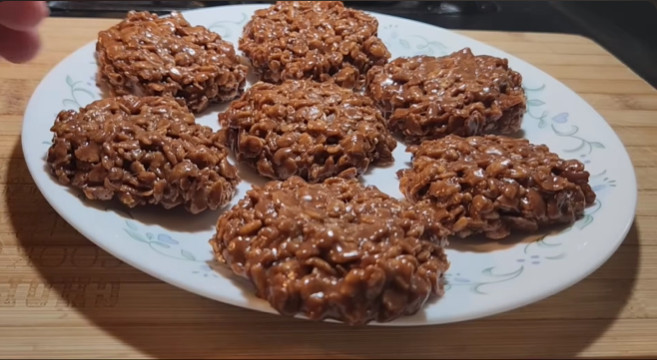
No Bake Rice Krispie Cookies Recipe
Craving something sweet, but don’t want to bake? My No-Bake Rice Krispies Cookies are an old-fashioned favorite that I’ve been making for years. They’re rich with cocoa, creamy peanut butter, and the perfect chewy bite from oats, all brought together with that signature Rice Krispies crunch.
Whether you’re whipping up a batch for a potluck, after-school snack, or just because you deserve a treat, these cookies are quick, easy, and always a crowd-pleaser. Plus, they store beautifully, making them ideal for make-ahead desserts.
Cooking the Cookie Mixture
Making these cookies is all about timing and working quickly while the mixture is hot. Here’s how I do it:
Mixing the Ingredients
In a large saucepan over medium-high heat, I combine the butter, granulated sugar, salt, whole milk, and unsweetened cocoa powder. I stir continuously until the mixture is completely smooth; this usually takes about 2 minutes.
Once smooth, I bring it to a FULL boil. It’s important to let it boil for exactly 3 minutes, no more, no less. This helps the sugar reach the perfect temperature so the cookies set correctly. I stir once or twice during boiling, but avoid over-stirring.
Adding the Flavor
When the 3 minutes are up, I remove the saucepan from the heat and immediately stir in the peanut butter and vanilla extract. The heat from the mixture melts the peanut butter into a silky, chocolatey base.
Bringing in the Oats
Next, I add the oats and stir until everything is evenly coated. I let the mixture sit for about 3 minutes so it begins to firm slightly. This makes it easier to shape the cookies.
Shaping the Cookies
Once the mixture is ready, I use a tablespoon or cookie scoop to drop mounds onto the parchment-lined baking sheets. If you prefer bars instead of cookies, you can spread the mixture into an 8×8-inch pan and chill before cutting into squares.
The cookies will start to set at room temperature in about an hour. If I’m in a hurry, I pop them into the refrigerator for 20–30 minutes to speed things up.
Serving and Decoration
Serving Suggestions
I love serving these cookies as a quick after-school snack with a cold glass of milk, but they’re also a hit at bake sales, potlucks, and holiday dessert tables. Since they’re no-bake, they’re light yet satisfying, perfect for warmer months when you don’t want to heat up the kitchen.
For a fun presentation, I sometimes place them in mini cupcake liners. It not only makes them look adorable but also keeps fingers clean when picking them up.
Delicious Topping Ideas
While these cookies are amazing just as they are, you can easily dress them up:
- Chocolate Drizzle: Melt some chocolate chips and drizzle over the cookies for extra indulgence.
- Sprinkles: Colorful sprinkles make them festive for birthdays or holidays.
- Sea Salt: A light sprinkle of flaky sea salt before they set enhances the chocolate flavor beautifully.
- Shredded Coconut: Adds a lovely tropical twist and extra texture.
Custom Flavor Variations
One of my favorite things about this recipe is how adaptable it is. You can:
- Swap peanut butter for almond butter or sunflower seed butter for a nut-free version.
- Add mini marshmallows for a Rocky Road-inspired cookie.
- Mix in dried cranberries or chopped nuts for extra flavor and crunch.
Storage Instructions
Keeping the Cookies Fresh
Once the cookies are completely set, I store them in an airtight container at room temperature. They stay fresh for up to 5 days this way, making them a great make-ahead treat for busy weeks.
If your kitchen runs warm, you can refrigerate them to keep the chocolate firm. Just let them sit at room temperature for a few minutes before eating so they soften slightly.
Freezing for Later
These cookies also freeze beautifully. I layer them between sheets of parchment paper in a freezer-safe container or bag, removing as much air as possible. They can be frozen for up to 2 months.
To enjoy again, I let them thaw at room temperature for about 30 minutes; they taste just as delicious as the day I made them.
No Bake Rice Krispie Cookies Recipe
Ingredients
Video
Notes
Required Kitchen Tools
When making No-Bake Rice Krispie Cookies, having the right tools ready makes the process faster and more enjoyable:- Large Saucepan: Needed for melting the butter, sugar, and cocoa together before adding the rest of the ingredients.
- Wooden Spoon or Silicone Spatula: Perfect for stirring and combining ingredients evenly.
- Measuring Cups and Spoons: Accuracy is important for the perfect texture.
- Parchment-Lined Baking Sheets: For dropping the cookie mixture without sticking.
- Tablespoon or Cookie Scoop: Ensures uniform size and even setting.
Frequently Asked Questions
1. Can I make these cookies without peanut butter?
Yes! You can substitute peanut butter with almond butter, cashew butter, or sunflower seed butter for a nut-free option. The flavor will change slightly, but the texture will remain delicious.
2. Why do my no-bake cookies turn out dry?
This usually happens if the mixture is boiled for too long. Be sure to boil it for exactly 3 minutes; overcooking causes the sugar to harden too much, making the cookies crumbly.
3. Can I use quick oats instead of old-fashioned oats?
Yes, quick oats work well and give a softer texture. Old-fashioned oats will give more chewiness, so it’s just a matter of preference.
4. How do I keep my cookies from sticking to the pan?
Always line your baking sheets with parchment paper or use a silicone baking mat. This makes it easy to lift the cookies without breaking them.
5. Can I add Rice Krispies cereal directly into the mixture?
Absolutely! While this recipe focuses on oats for chewiness, adding 1–2 cups of Rice Krispies cereal will boost the crunch factor even more.
6. How long do they take to set?
At room temperature, they usually set in about 1 hour. If you’re in a rush, pop them into the refrigerator for 20–30 minutes.
7. Can I make these cookies vegan?
Yes, replace butter with coconut oil or vegan butter, use plant-based milk instead of whole milk, and ensure your chocolate and peanut butter are vegan-friendly.
Conclusion
My No-Bake Rice Krispie Cookies are the perfect example of a simple, old-fashioned recipe that delivers maximum flavor with minimal effort. With their chocolate-peanut butter goodness, chewy oats, and satisfying crunch, they hit all the right notes for a homemade treat.
Whether you follow the recipe exactly or play around with toppings and variations, you’ll end up with a batch of cookies that everyone loves. So grab your saucepan, measure out your ingredients, and in just a few minutes, you’ll have a plate of cookies ready to share, no oven required.

Sophia Smith is a passionate home baker and dessert enthusiast who loves sharing her favorite recipes, baking tips, and kitchen secrets. Through Roses Baking Passion, she inspires others to bake with love and creativity every day.