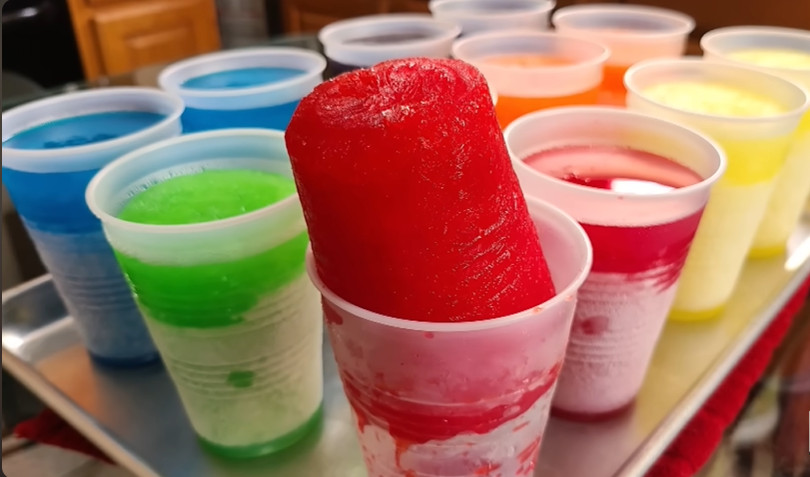
Lilly Dilly Freeze Cups Recipe : Sweet, Fruity & Perfectly Chilled!
Craving a nostalgic frozen treat that takes you back to childhood summers? Lilly Dilly Freeze Cups are the perfect answer! These colourful, icy delights are sweet, refreshing, and incredibly easy to make at home. With just a few simple ingredients like Kool-Aid, sugar, and water, you can whip up a batch of freeze cups that everyone, from kids to adults, will love. Whether you enjoy them on a hot summer afternoon or serve them at a backyard party, these fruity cups are sure to be a hit.
Preparing the Lilly Dilly Freeze Cups
Making freeze cups is all about simplicity and fun. The process is quick and easy; you need to give them enough time in the freezer to set properly. Here’s how I prepare mine step by step:
Mixing the Ingredients
- Dissolve the Sugar:
Start by pouring 4 quarts of hot water into a large pot or mixing bowl. Add the 3 cups of sugar and stir until completely dissolved. This step is crucial in ensuring your freeze cups have a smooth, sweet taste without any gritty sugar crystals. - Add the Kool-Aid Flavours:
Open your six assorted Kool-Aid packs and add them one by one to the sweetened water. Stir well to ensure the colours and flavours are evenly blended. This is where the magic happens; you’ll see the mixture transform into a vibrant, rainbow-coloured, fruity goodness. - Taste and Adjust (Optional):
If you prefer a sweeter flavour, you can add an extra ½ cup of sugar. For a lighter taste, reduce the sugar slightly. This recipe is super flexible!
Filling the Cups
- Place 12 sturdy paper cups on a baking sheet.
- Pour the Kool-Aid mixture into each cup, filling about ¾ of the way full. This gives the liquid room to expand as it freezes.
- Ensure the cups are evenly spaced on the baking sheet to prevent them from tipping over while freezing.
Freezing the Cups
- Carefully transfer the baking sheet with cups into your freezer.
- Let them freeze for at least 10 hours or overnight. The longer they freeze, the firmer and icier they’ll be.
- When ready to serve, peel the paper cup away or let it thaw for 2–3 minutes before enjoying.
At this stage, your Lilly Dilly Freeze Cups are ready to be enjoyed plain or dressed up with fun toppings!

Serving and Decoration
One of the best things about Lilly Dilly Freeze Cups is their fun and customizable nature. You can keep them simple for a classic summer vibe or dress them up with creative toppings for a party-ready treat.
Suggested Toppings and Variations
- Fresh Fruit Slices: Add small chunks of strawberries, blueberries, or pineapple before freezing for an extra burst of flavour.
- Whipped Cream Swirl: Top with a dollop of whipped cream right before serving for a creamy contrast to the icy base.
- Candy Mix-ins: Kids love adding gummy bears or Skittles inside the cups before freezing—it makes for a sweet surprise!
- Sour Punch Twist: Mix in sour candy strips or drizzle sour syrup on top for a tangy kick.
- Layered Freeze Cups: Instead of mixing all the Kool-Aid, try layering different colours for a rainbow effect. Just freeze each layer halfway before adding the next.
Fun Serving Ideas
- Backyard Parties: Serve frozen cups in a cooler filled with ice to keep them cold and refreshing outdoors.
- Summer BBQs: Pair with grilled favourites for an icy finish.
- Kids’ Birthdays: Hand out freeze cups as a colourful, mess-free dessert option.
- DIY Topping Bar: Set out sprinkles, candies, and syrups so everyone can decorate their own cup.
With these toppings and serving ideas, your Lilly Dilly Freeze Cups will be the highlight of any gathering.
Storage Instructions
Keeping your Lilly Dilly Freeze Cups fresh and tasty is super easy.
How to Store in the Freezer
- Place the filled paper cups upright on a baking sheet, cover them loosely with plastic wrap or foil, and keep them in the freezer.
- They can last up to 2 months without losing flavour. Just make sure they’re sealed well to prevent freezer burn.
Quick Serving Tip
When you’re ready to enjoy, remove a cup from the freezer and let it sit at room temperature for 2–3 minutes. This makes peeling the paper cup off easier and gives you the perfect soft, icy texture.
Lilly Dilly Freeze Cups Recipe
Ingredients
Video
Notes
Required Kitchen Tools
Making freeze cups is super easy, but having the right tools makes the process smoother:- Large Pot or Mixing Bowl: For dissolving sugar and mixing in Kool-Aid flavours.
- Measuring Cups: To ensure accurate portions of sugar and water.
- Whisk or large spoon: Helps dissolve sugar and evenly mix flavours.
- Baking Sheet: Keeps cups steady and easy to transfer into the freezer.
- Freezer-Safe Paper Cups: Essential for shaping and holding your freeze cups.
Frequently Asked Questions (FAQ)
1. What are Lilly Dilly Freeze Cups?
Lilly Dilly Freeze Cups are sweet, fruity frozen treats made with Kool-Aid, sugar, and water. They’re poured into cups and frozen until firm, making them a nostalgic summer snack that kids and adults love.
2. Can I use less sugar in this recipe?
Yes! You can adjust the sugar level to suit your preference. If you prefer a lighter, less sweet taste, reduce the sugar by ½ to 1 cup. You can also try using a sugar substitute, such as Stevia or Splenda.
3. How long do Lilly Dilly Freeze Cups need to freeze?
They should be frozen for at least 10 hours or overnight to get the perfect icy texture. The longer they freeze, the firmer they become.
4. Can I make freeze cups with juice instead of Kool-Aid?
Absolutely! You can replace Kool-Aid with fruit juice, lemonade, or even sports drinks for a fun twist. The method stays the same.
5. How do I store Lilly Dilly Freeze Cups?
Please keep them in the freezer covered with plastic wrap or foil. They last up to 2 months when properly stored.
6. Can I add toppings to frozen cups?
Yes! Fresh fruit, candies, or even whipped cream can be added either before freezing (for mix-ins) or after freezing (for toppings).
7. What type of cups should I use?
Sturdy paper cups are best for freezing and easy peeling. Avoid thin cups, as they may rip when removing the frozen treat.
Conclusion
And there you have it, my homemade Lilly Dilly Freeze Cups Recipe! These nostalgic, fruity ice cups are not only fun to make but also evoke memories of summer, when enjoying colourful, icy treats with friends and family.
From experimenting with different varieties and adding various toppings, possibilities are endless. Whether you’re hosting a backyard barbecue, planning a kids’ party, or just looking for a refreshing snack to cool off, these freeze cups are the ultimate go-to.
So grab your favourite flavours, whip up a batch, and let the freezer do the work. Trust me, once you try them, you’ll be making Lilly Dilly Freeze Cups all summer long!

Sophia Smith is a passionate home baker and dessert enthusiast who loves sharing her favorite recipes, baking tips, and kitchen secrets. Through Roses Baking Passion, she inspires others to bake with love and creativity every day.